Welcome
Get started
Thumbdrive
http://bit.ly/escher-rbr2018
Esche.rs
Exploring functional geometry
Motivation
It was the year 1982 when Peter Henderson, publishes a paper called Functional Geometry. In it he describes an algebra of pictures that allowed him to recreate Escher's Square Limit.
The 2002 reprint of the article inspired Einar Host to give a talk and a workshop.
I was lucky enough to attend that workshop at Booster Conf. I had such a good time that I translated the workshop to Rust.
I hope that you enjoy it as much as I did, when I first learned how to recreate Escher's Square Limit in code.
Documentation
In this workshop you are given starter code. A lot of the starter code can be treated as a black box. You should need to now the implementation.
But it could well be that you want to look up the API. For that there is documentation.
Grid method
During the workshop we will be relying on a technique well know to painters. It is called the grid method.
Let's explain this method with our tRusted logo.
![]()
The first thing we do to our logo is overlay a grid.
![]()
Next we draw a second grid, similar to the first.

Now we focus on a single cell in the original grid, and accurately copy it in the corresponding grid in the target grid. Going from top to bottom and from left to right, our first cell is empty. The second cell has a single tooth of the gear. Let's copy it over.
The following cell has some more teeth.
By copying each cell one by one, the original logo is recreated.
until the original is completely copied.
Variations
Once we understand the basics of the grid method, we can start to look for variations. Nobody is restricting you to draw the target grid differently.
Scale
We could scale the grid.
Non-uniform scale
We could scale the grid non-uniformly.
Shearing
We could shear the grid.
Combination
Or we could combine various transformation and apply that to the grid.
Because we will make extensive use of the grid method, and want to easily manipulate the grid, we will introduce a box abstraction.
Box
We learned about the grid method. It allows us to instruct an artist that knows how to copy a picture from a grid, how we want the picture copied. This can be achieved by controlling the grid the artist will copy the picture into. The grid method relies on a box. So we better should get to know our boxes.

Above you find a pictorial representation of a box. It is defined by three
vectors, a, which is red in the picture, b which is orange in the picture
and c which is purple in the picture.
# #![allow(unused_variables)]
#fn main() {
/// A Box represents the area and position that we will draw in.
#[derive(Debug, PartialEq, Clone, Copy)]
pub struct Box {
    /// Determines the origin of the drawing area, used to position the box.
    pub a: Vector<f64>,
    /// Determines the x axis of the box.
    pub b: Vector<f64>,
    /// Determines the y axis of the box.
    pub c: Vector<f64>,
}
#}
The above struct is a literal conversion from the picture. If you are
wondering what these Vectors are, take a look at the
documentation.
The letter d
You need to walk before you run. So instead of starting with drawing fish, we will take a look at the letter d.

The letter d is a recognizable shape that does not have a lot of symmetries. I.e. If you rotate it or flip it, it doesn't look lite itself anymore. This isn't true for the letter H for example.
By focusing on the letter d and transforming it, we can figure out how to change our box. This is hard work, but very rewarding.
If you follow along and implement the functions laid out by the next chapters, you are well on your way to reproducing Eschers Square Limit.
Turn

Our goal is to turn our letter through ninety degrees. As explained in the background chapter we are going to do this by rotating the box. This way the picture will be drawn turned automatically.
Here we see our goal box on the right, and the reference box on the left. Let's
figure out the relations between the new box fields a, b and c and the
reference box fields a, b, c.

Notice that for the target box the a field is the sum of the original box a
and b field.

The new b is the original c and the new c is the original b negated.
Implement
Open src/canvas/mod.rs and find the turn_box function. At the moment it is
implemented by calling the identity function on its argument
identity(&bx)
We need to change that and return a turned box. Box has a constructor called
new. When provided with three Vector arguments it will a create a box with
the corresponding fields.
Take a look at the documentation for Vector in order
to figure out how to do vector addition and vector negation.
Having done that, try to implement the turn_box function correctly. You can
test your function by running geometry binary.
cargo run --bin geometry
This should produce an output.svg and if you implemented turn_box correctly
should show the letter d turned.
Flip

Now our new goal is to flip our letter. Just as for the turned picture, we are going to do this by flipping the box. For the next few chapters this will be our goal; finding a target box.
Again, we see our goal box on the right, and the reference box on the left. Let's
figure out the relations between the new box fields a, b and c and the
reference box fields a, b, c.

Notice that for the target box the a field is again the sum of the original box a
and b field.
The new b is the original b negated and the new c is the original c.
Implement
Open src/canvas/mod.rs and find the flip_box function. Just like the
turn_box function before, it is implemented by calling the identity function
on its argument
identity(&bx)
We need to change that and return a flipped box. It is very is very similar to
the turn_box function, so a good start is to copy that body and change it.
Testing your function is a little bit more involved now. Early you could run
geometry binary. Below you can find the main function of the geometry
binary.
# #![allow(unused_variables)]
#fn main() {
let bx = Bx::new(
    Vector::new(0f64, 0f64),
    Vector::new(400f64, 0f64),
    Vector::new(0f64, 400f64)
);
let shapes = letter::d();
let source = create_picture(shapes);
let picture = turn(source);
let document = to_svg((400f64, 400f64), &picture(&bx));
svg::save("output.svg", &document).unwrap();
#}
The line to look out for is the let picture line. Here we call the function
turn on our source shape. This function is found in the picture module. The
turn function is reproduced here. It can be found in src/picture/mod.rs.
# #![allow(unused_variables)]
#fn main() {
pub fn turn<Picture>(picture: Rc<Picture>) -> Rc<impl Fn(&Bx) -> Rendering>
where Picture: Fn(&Bx) -> Rendering{
    let p = picture.clone();
    Rc::new(move |bx: &Bx| {
        let turned_box = turn_box(&bx);
        p(&turned_box)
    })
}
#}
Whoah, look at that signature! It is wild! Take a deep breath, we will explain the signature in a moment. The important parts, the part that turns the picture is nicely tucked away.
# #![allow(unused_variables)]
#fn main() {
let turned_box = turn_box(&bx);
p(&turned_box)
#}
Here we recognize our turn_box function, returning a turned_box which is
passed as an argument to what ever p is.
There is a lot going on besides that in the turn picture, but a lot of it is
boilerplate. We will explain that shortly. For now just copy the body of the
turn function, replace the body of the flip function with the copy and alter
it to use your flip_box function instead.
This takes care of the flip function, but it still needs to be called. Open
the geometry binary and change the let picture to call flip instead of
turn on the source.
If every thing worked out just fine, you should be able to run geomtry with
the following command
cargo run --bin geometry
and find a flipped letter d in output.svg.
Picture
In the last chapter we looked at the interesting signature of the turn
function. We will repeated it here.
# #![allow(unused_variables)]
#fn main() {
pub fn turn<Picture>(picture: Rc<Picture>) -> Rc<impl Fn(&Bx) -> Rendering>
where Picture: Fn(&Bx) -> Rendering
#}
There is a lot going on. There is even a piece of information missing. I.e.
Rendering is a type alias.
# #![allow(unused_variables)]
#fn main() {
pub type Rendering = Vec<(Shape, Style)>;
#}
Let's take some time to think and see what this signature is all about.
Shape & Style
Shape are primitive drawing instructions. Various sort of lines and
instructions and where to place them. If you are really curious you can take a look
at the documentation.
The basic shapes are used to provide more abstract drawing instructions such as letters or grids.
Style instructs
an artist with which style to draw the shapes.
We will treat Shape and Style, and their derivatives, as black boxes. We
will use them as is, without further inspection.
Rendering
Single stroke art is a thing, but in general art is made with more elements. A
Rendering is just that, a sequences of shapes drawn with a certain style.
Rendering is a
type alias.
It offers a nice shorthand for a type expression, but is otherwise
interchangeable with the long form.
Here is the definition
# #![allow(unused_variables)]
#fn main() {
pub type Rendering = Vec<(Shape, Style)>;
#}
Picture
Let's take a look at an other alias, this time defined in the signature of the
turn function. For reference we repeat the definition below.
# #![allow(unused_variables)]
#fn main() {
where Picture: Fn(&Bx) -> Rendering
#}
A picture is a function that borrows a box, the one defined a few chapters back,
and returns a Rendering, i.e. a sequence of shapes to draw.
This is the most important abstraction that we will introduce. All following types are in place to make these abstraction usable and safe.
Rc
It you take a look at the type signature of turn you will notice that the
Picture is wrapped in a Rc. It is a
A single-threaded reference-counting pointer.
As can be seen from the Rc documentation.
The reason we need a reference counting pointer to the Picture here is
two-fold.
Picture can not be owned
The first reason we need an reference counting pointer to the Picture is that
we might want to reuse the picture. If you look back at Eschers square limit,
you could see a lot of repetition in the image. As if a stamp is used to create
the collage of fishes.
This means that we can not take ownership of Picture, because otherwise other
parts of our program can not reuse it.
Picture can not be referenced
Usually a possible solution to not owning data is to take a reference.
Unfortunately, that is not an option here. It is a bit involved, but it has to
do with lifetimes.
In order for the Rust compiler to make some guarantees, the languages introduces lifetimes. The lifetimes of a piece of data is akin to a scope in which that data is valid.
Often Rust infers the lifetime for you, sometimes it can't. We opted for the easy way out.
Rc to the rescue
Luckily, with a reference counting pointer, these problems go away. We do trade something for it. We can't use our program in a multi-threaded environment. We could if we really wanted, but for this workshop we are not really interested in multi-threading.
The second is speed. Reference counting happens at run-time. This has a little overhead that we need to pay each time we run the program. This isn't a concern for us as well.
Blackbox
We have looked into the reason why Picture is defined as it is. With that
knowledge under our belt, we continue with our goal. Recreating Eschers square
limit.
Toss

With the information about Picture in our mind, we toss ourselves on our new
goal. We want to toss our letter d in the air. By now our method of operation is
familiar. Define a tossed box and use it to define our toss function.

Look at the reference box and the tossed box. Whoops, it draws outside of the boundary! Is that even allowed?
Let's try to figure out the vectors for our tossed box. The new a vector is right
between the the original b and c vectors. I.e. \(a' = a+\frac{b + c}{2}\).
the new b vector is halve as large as the vector addition of b + c. I.e.
\(b' = \frac{b + c}{2}\).
The new c is halve as large as the vector from b that reaches c. I.e.
\(c' = \frac{c - b}{2}\).
Implement
Having found the relations between the original box defining vectors and the tossed box its defining vector, we can proceed to implement it.
Again in src/canvas/mod.rs you find a default implementation of tossed_box.
Adopt it to reflect an actual tossed box.
Then find the toss function in src/picture/mod.rs and use the freshly
defined tossed_box function in its body.
Next don't forget to change geometry binary to use the new toss function,
execute it and marvel at the tossed letter d in output.svg.
Above

The transformation that we are tackling next is to place one picture above an
other. although in our example both pictures evenly divide the box between them,
we are going to create a more versatile primitive and than use it to create the
above function.

We are going to create a split_box_horizontally that takes a factor and a box
and splits the box in two. So it return a pair of boxes. The factor determines
how much the top box gets to occupy of the original box. The bottom box then
will occupy 1.0 - factor.
Implement
Head over to src/canvas/mod.rs and implement split_box_horizontally. It
helped my to introduce helper functions scale_box_horizontally and
move_box_horizontally.
With this primitive open src/picture/mod.rs and define function above_ratio.
This function accepts two pictures and two non-negative integers m and n. These integers are
used to calculate how much of the pictures get to occupy of the original box.
I.e. the top picture should occupy \(\frac{m}{m+n}\) of the original box.
Go on and define above in terms of above_ratio. Then use it in
geometry.rs. For above we need to provide two pictures. Remember that we can
clone a picture to use it more than once. Find the correct combination of
primitives to recreate the picture at the start of this chapter.
Beside

What to do now is very similar what you did in the previous chapter. Instead of stacking pictures horizontally, you are going to "stack" them vertically.

Implement
Copy and pasting and changing horizontally in vertically will bring this chapters goal within reach. And there is nothing wrong with that.
But if you want to challenge yourself, you could also think of using the tools already present. By cleverly combining turns and above one can get beside.
Either way, once you created beside, make sure to test it out. And say goodbye
to src/canvas/mod.rs, you won't need to touch it again. All the primitive
operations are in place.
quartet

A quartet of images, our next goal we will take on. As promised, we will not need to create a box this time. Instead, we our going to use the primitives we already created ourselves.
Take some time and study the picture. How are the different parts related? Do any picture primitives spring to mind?
Implementation
Open src/picture/mod.rs. In it you will find the quartet function. Below is
it's signature repeated.
# #![allow(unused_variables)]
#fn main() {
pub fn quartet<P, Q, R, S>(nw: Rc<P>, ne: Rc<Q>, sw: Rc<R>, se: Rc<S>) -> Rc<impl Fn(&Bx) -> Rendering>
where P: Fn(&Bx) -> Rendering, Q: Fn(&Bx) -> Rendering, R: Fn(&Bx) -> Rendering, S: Fn(&Bx) -> Rendering
#}
It is hard to look at. The reason for this is that Rust treats every closure as
its own type. So even though the type parameters P, Q, R and S seem to
be defined the same, at compile time they could be different.
Either way, the implementation of the quartet should result in a Rendering of
the arguments. They are called nw, ne, sw and se to help orient them in
the quartet.
When you find the right combination of picture primitives make sure to enjoy
your hard-work and use it in the geometry binary.
nonet

What four is to quartet, nine is to nonet. This time we will arrange nine pictures in a nice grid. Again, this can be achieved with the primitives we defined our selves.
Analyze the image and dream up a way to build it.
Implementation
If you don't like spoilers do not read any further. I am going to tell you how I approached the problem. I introduced to intermediate picture primitives, a column and a row. A column stacks three pictures atop each other, and row does the same, but puts them side by side. With these primitives nonet is defined with a few lines of code.
If you have defined the nonet, go ahead and appreciate your hard work. Use it in
the geometry binary and enjoy the marvelous nonet.
over

This is the last stop before we start drawing fishes. It feels a bit low-level
in comparison to quartet and nonet, but we can still make it in the comfort of
our src/picture/mod.rs.
The image that we show is that of the letter d that is drawn over a tossed
letter d. So our over function should take two pictures, draw one and draw the
other in the same box.
Implementation.
Without giving the crux away, I would like to point out the definition of
Rendering again.
# #![allow(unused_variables)]
#fn main() {
pub type Rendering = Vec<(Shape, Style)>;
#}
It is nothing more than a vector of shape & style pairs. You can probably use that to your advantage. If you have a hard time figuring out this primitive, make sure to discuss it with your neighbor.
Once you get the solution show your work to your discussion partner by using it
in the geometry binary.
Drawing an Owl

On the internet there is an image that explains how to draw an owl.
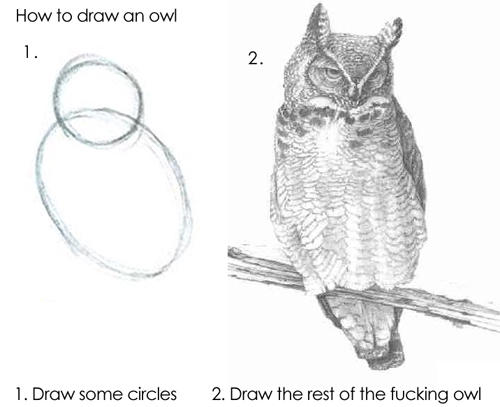
With the possibility of stating something similar I will give you the fish
shape as a black box. I can imagine that you feel a bit disappointed. In my
defense you should take a look at the definition of the fish.
Implementation
You can use the fish by using the right module.
# #![allow(unused_variables)]
#fn main() {
use eschers::shape::letter;
#}
and calling the appropriate function, which is aptly named fish.
# #![allow(unused_variables)]
#fn main() {
let shapes = escher::fish();
#}
With our fishing rod in hand and our picture primitives under our belt, we are ready to scale mount Escher. We will do that be defining some tiles and stitching them together in our final image.
ttile

Wow, don't the fish interlock nicely. In it Eschers brilliance shines through. He painstakingly experimented with shapes that have this interlocking properties, without losing the animal in the process.
We can appreciate his hard work by puzzling ourselves. Which primitives recreate the ttile?
Implementation
With some effort the ttile can be defined succinctly. Quickly, use it in
geometry binary.
utile

This fish just keeps on giving. The number of symmetries is has. The ways it can interlock. How many laments can you give to an artist?
Implementation
Your hard work will be appreciated.
side

Beautiful. What you are looking at it the order 3 side of fish. Escher Square Limit obviously is a finite picture, there are only so many fish one can draw. But it clearly hints at the image it wants to be. The infinite arrangement of fish we are working on to recreate.
One way to do that is with recursion. It can be hard to literally see how, so I will draw your attention to some of the finer details.

At the bottom squares you could recognize the ttile of fish we created moments ago. And in the bottom squares. Wait a minute, that is our side that we are creating, only with one level less.
Implementation
Find the appropriate primitives and connect them in the right way to create a recursive side.
corner

We have just created a recursive side so the recursion is strong in us. The corner in her turn is recursive as well. Lets focus our eye on some of the details.

In the bottom right corner a utile can be recognized. The top right is our friend side. The bottom left is also a side, but now turned and the recursion starts in the top left, where we find our own corner but of a lesser order.
Implementation
Go on young artist, Eschers Square limit is awaiting us.
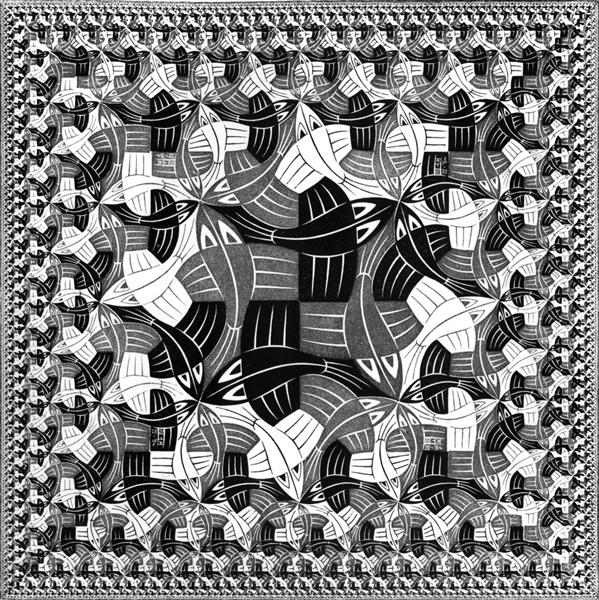
square_limit

This is it. The final stage of our long quest. You now what to do. You have the tools in your possession. A final glimpse into the structure of the image is all we need.

Implementation
It is a bit of a puzzle, but you will get there.
Farewell
Like all good things, this workshop draws to a close. I hope you enjoyed your self, appreciated the art that you created and learned something along the way.
Feedback
Feel free to come talk to me and express how you experienced the workshop. If you have any improvements please checkout the repository, file an issue or provide a pull-request.